Basic Network
Network Manager in StackBill CMP
StackBill provides private networking, traffic filtering, and load balancing so you can secure and control your application traffic.

StackBill provides private networking, traffic filtering, and load balancing so you can secure and control your application traffic.
- There are two types of network available in StackBill CMP they are L2 network, and Isolated network.
L2 Network on Stackbill Cloud Management portal.
- Click on the Network dropdown button below the virtual resources icon, Which is available in the top left corner. from the dropdown, Click on Basic Network, to create a new network.
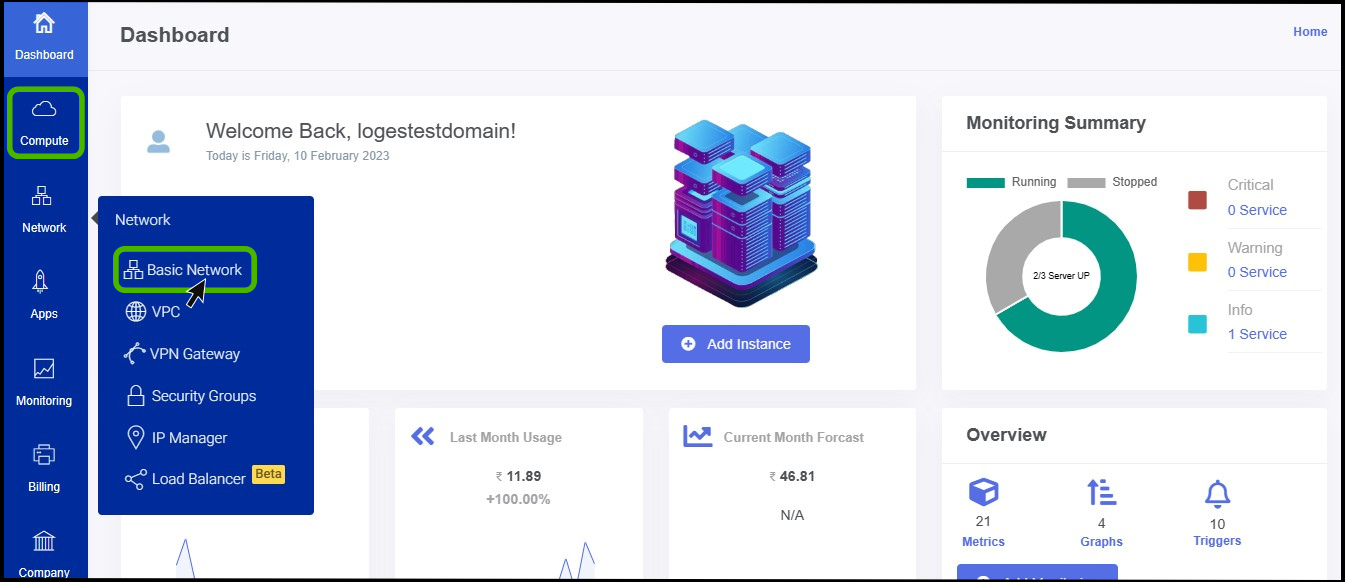
- Basic Network screen appears.
- At the right side of the panel the user can able to see a option called ADD NETWORK, Click on it.

- So once You click on the Add network button select the required network type as per the need.
The following document shows the flow of the L2 network.
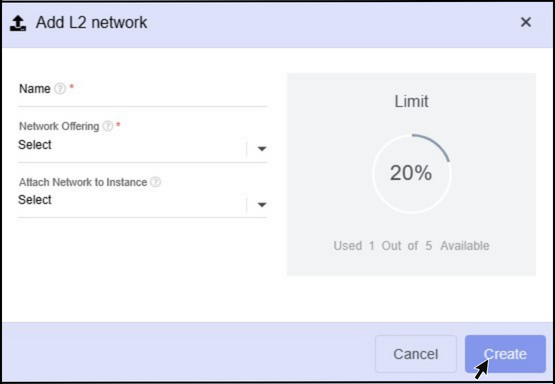
Name - Specify a name for the network.
Network offering - Select the Network offering.
Attach Network to Instance - The user can attach the network to their required instance using this option.
Finally,Click on the Create button.
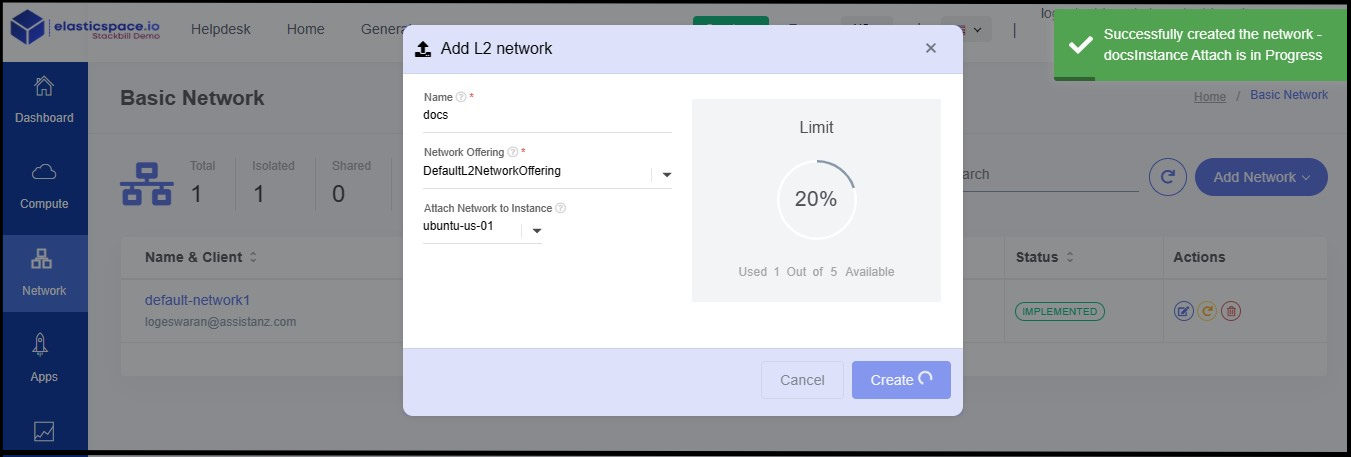
- Now the L2 Network has been created successfully.
Creating Isolated Network in StackBill CMP
An isolated network can be accessed only by virtual machines of a single account.
- Click on the Network dropdown button below the virtual resources icon, Which is available in the top left corner. from the dropdown, Click on Basic Network, to create a new network.

- Basic Network screen appears.
- At the right side of the panel the user can able to see a option called ADD NETWORK, Click on it.

- Once You click on the Add network button select isolated network option to create a isolated network.
The following document shows the flow of the Isolated network.

Name - Specify a name for the network.
Network offering - Select the Network offering.
Attach Network to Instance - The user can attach the network to their required instance using this option.
Finally,Click on the Create button.

- Now the Isolated Network has been created successfully.
Adding Network to Instance in StackBill CMP

- Click on the Virtual Resources dropdown button below the dashboard icon, Which is available in the top left corner. from the dropdown, Click on Instance option.

- Instance screen appears.
- Click on the particular instance.
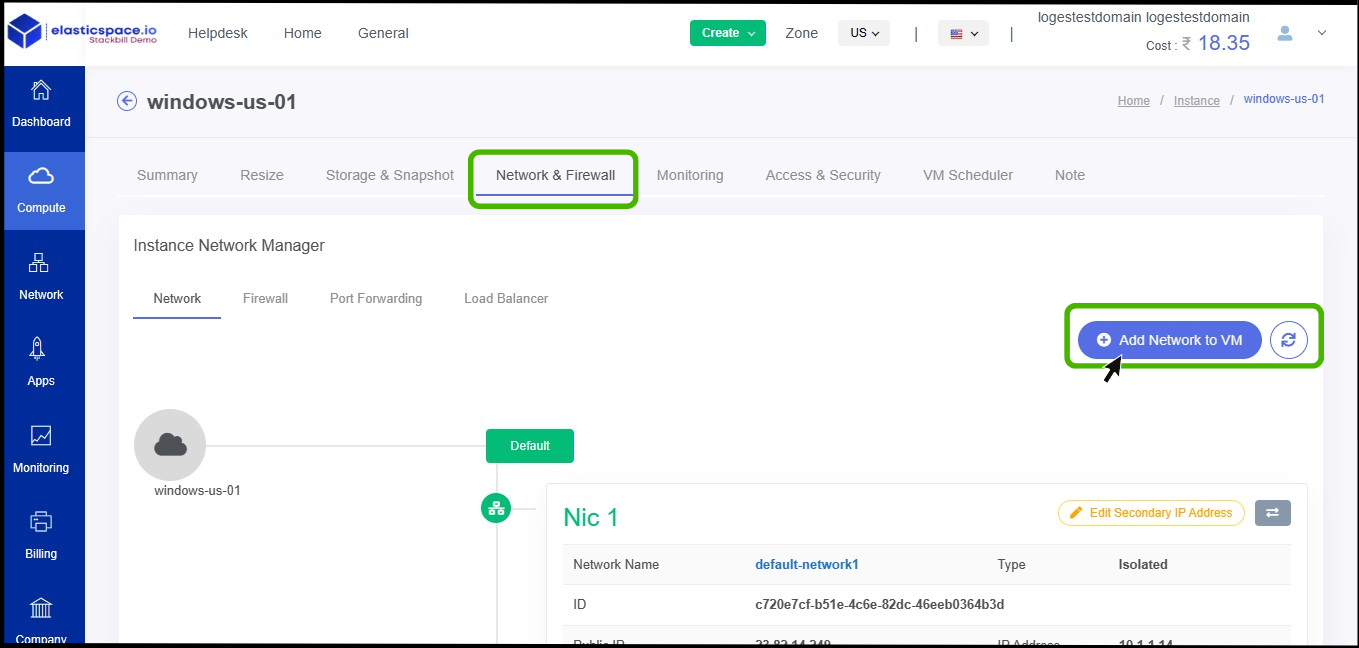
- Now the summary page of the instance appears, Select the Network & Firewall option on the summary.
- Network & Firewall option appears.
- At right side of the panel click on Add network to the VM button.
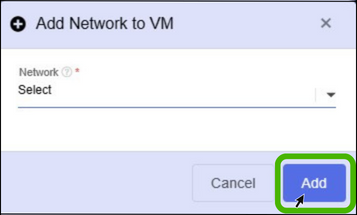
- Select the Network and click Add button.
IMG
- Now the the VM has been attached to network successfully.
Adding security groups in StackBill CMP
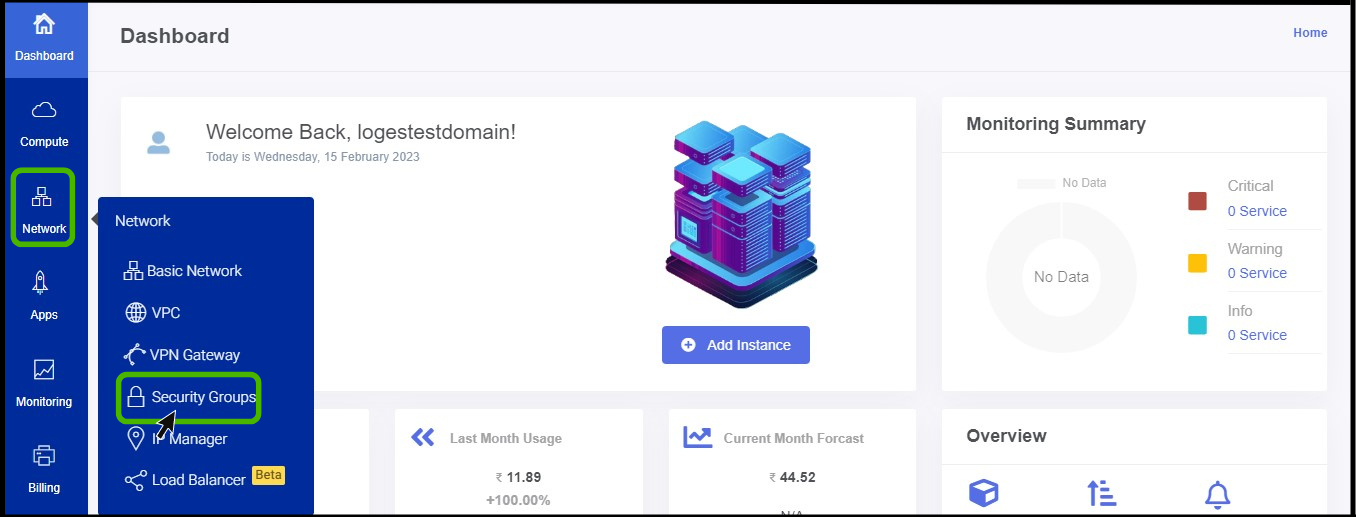
- Click on the Network dropdown button below the compute icon, Which is available in the top left corner. from the dropdown, Click on Security groups option.
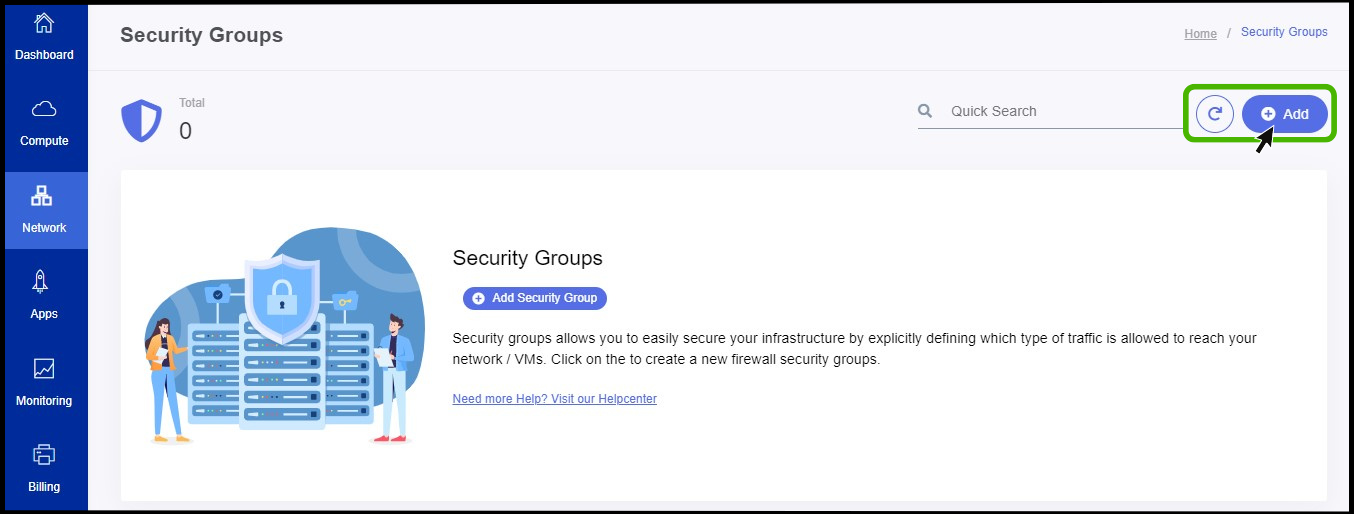
- Security group option appears on the screen.
- At right side of the panel the user can able to see a option called Add , Click on it to create a new security groups.
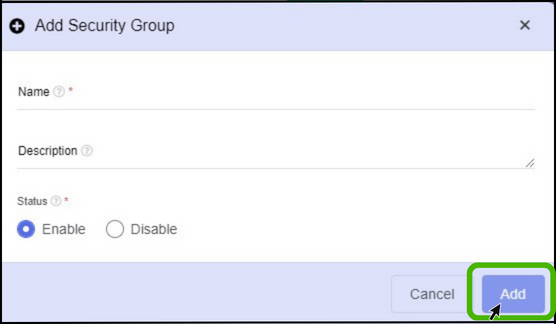
- Name - Specify a name for the security group that has been creating.
- Description - Give a short notes about the security group.
- Status - Specify IP version.
- Finally, Click on Add button.

- Now the security group has been created successfully.
What is mean by Network Address Translation?
NAT stands for Network Address Translation
It will translates set of IP address to another set of ip address
In other words, As per wikipedia, it expains " Network address translation is a method of mapping an IP address space into another by modifying network address information in the IP header of packets while they are in transit across a traffic routing device"
In StackBill CMP, there are two types of NAT is available. They are: Source NAT & Static NAT
Source NAT - It will be used as shared NAT, in other words, using this source NAT IP, we can able to access multiple virtual machines.
Static NAT - It will be the dedicated NAT. In other words, this NAT IP will be attached to only a single virtual machine. It's like one-to-one communication.
Configure Port forwarding
Port forwarding allows computer over the internet to connect a specific computer (or) service within a private network.
A port number will have an IP address and based on the port number to determine what the purpose is.
click on the Network dropdown below the virtual Resources icon, which is available in the top left corner. From the dropdown, click on Basic Network, to Configure Port Forwarding
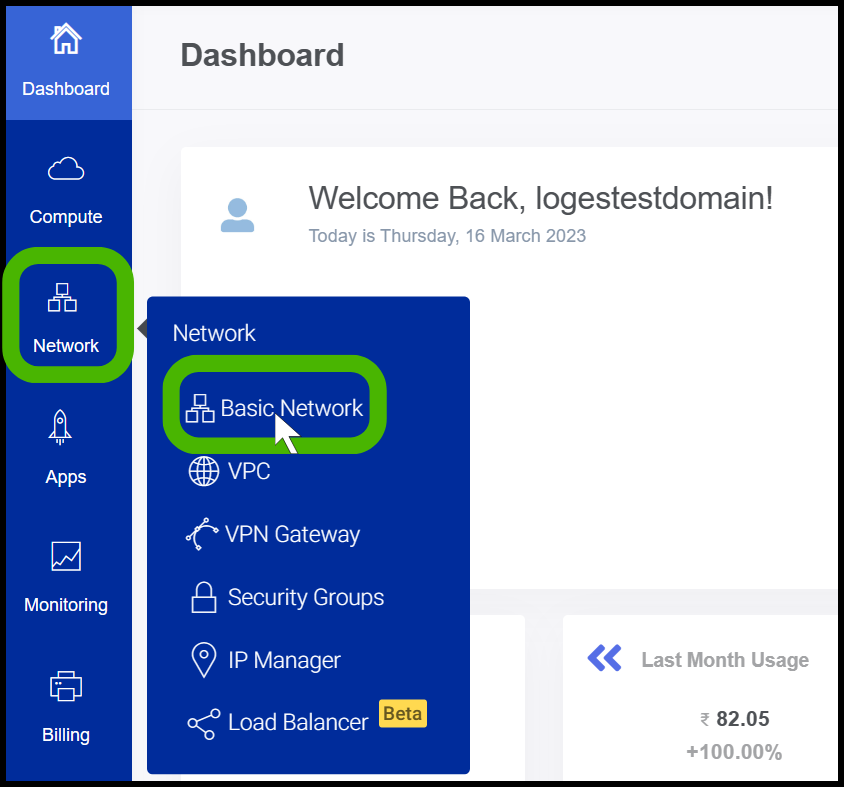
- Basic NetworkScreen appears.
- Click on the network in which you wish to configure port forwarding.

- Network details screen appears, Select the public IP section from the details screen.
.png)
- Click on the Source NAT option

- IP address screen open.
- Before configuring Port Forwarding user need to Configure Firewall
- To Configure the Firewall, click on Firewall option and configure it.
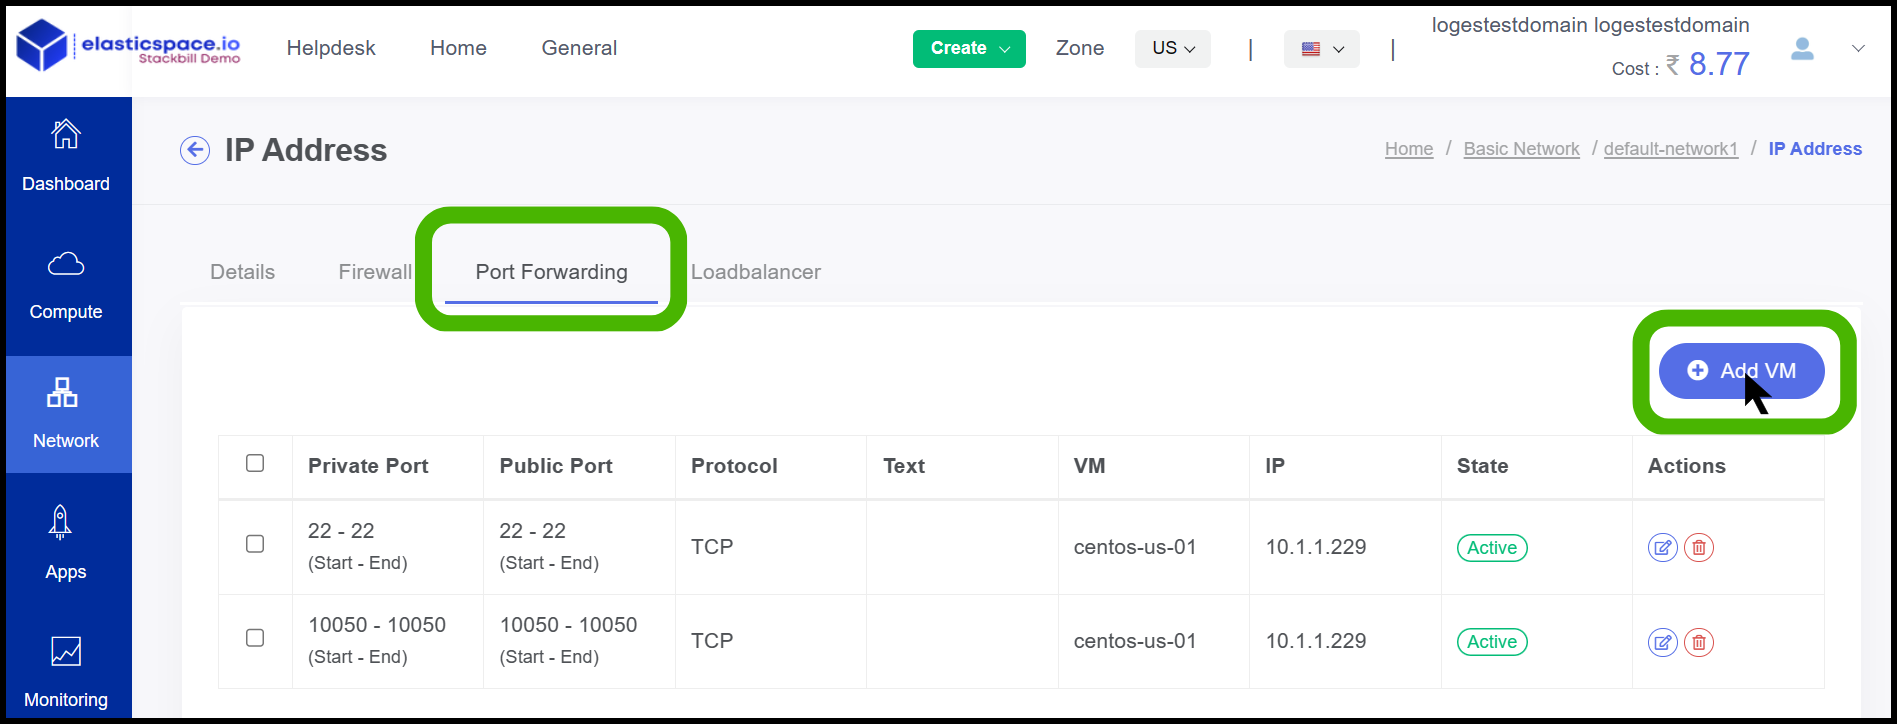
- Once the firewall has been configured go to the Port Forwarding option.
- Click on Add VM.
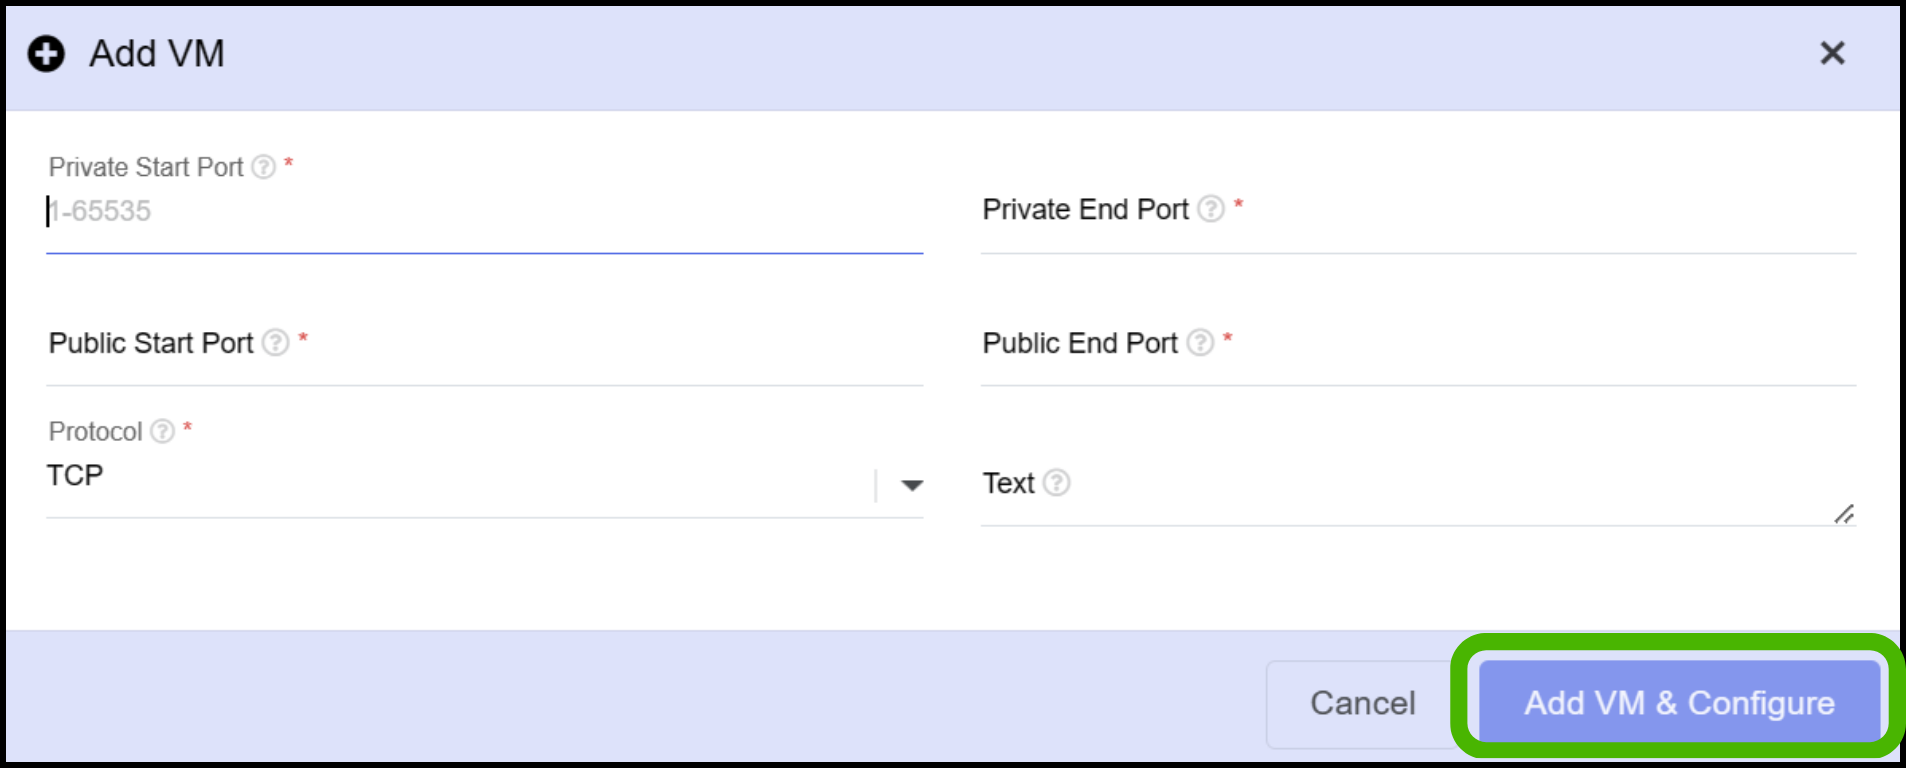
- Configure the required port and select the protocol
- Finally Click on Add VM & Configure.

- Now the Port Forwarding has been configured successfully.
Creating Egress rule on StackBill CMP
- Egress rule will be used to allow your virtual instance to access outside network i.e. Internet.

- Click on the particular security group in which the egress rule should be created.

- Now egress rule creating menu appears.
- The user can see an option called Add rule on the right side of the panel.
- Click on it.
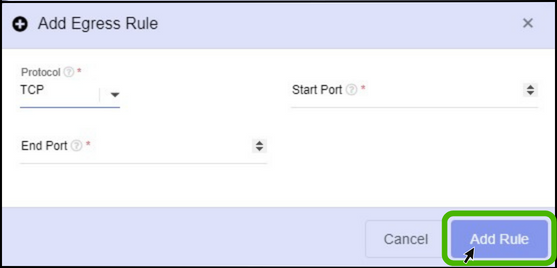
- Select the protocol as per the wish.
- Specify the start and end port number.
- Finally, Click on Add rule button.
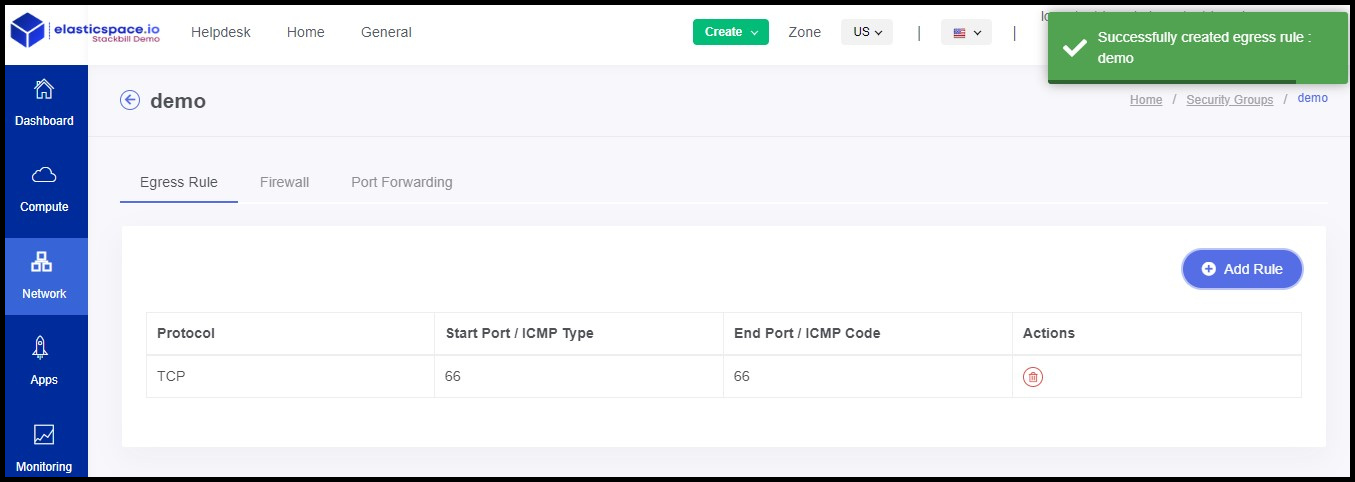
- Now the Egress rule has been created successfully.
IP Manager Overview on StackBill CMP
A StackBill CMP IP address is a publicly-accessible static IP address that you can assign to an instance and then reassign to another Instance later. To build a high-availability infrastructure, you can implement a failover mechanism using reserved IP addresses.
Acquiring new public IP address
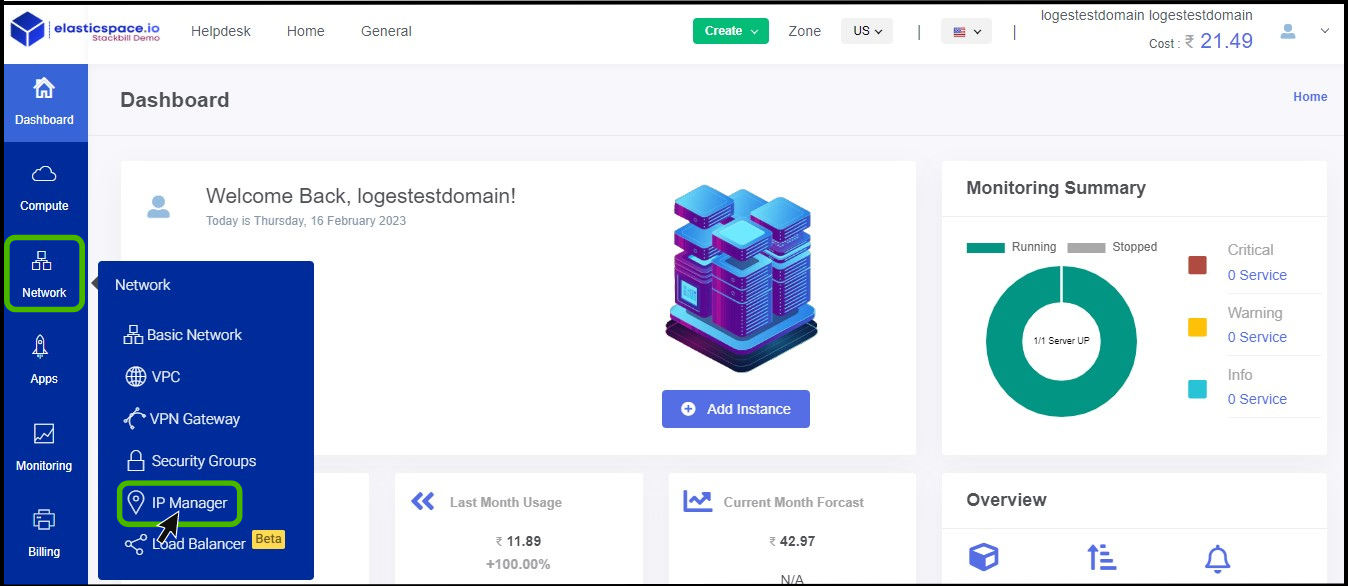
- Click on the Network dropdown button below the compute icon, Which is available in the top left corner. from the dropdown, Click on Ip Manager option.

- IP manager screen appears.
- Click on Acquire New Public IP option.
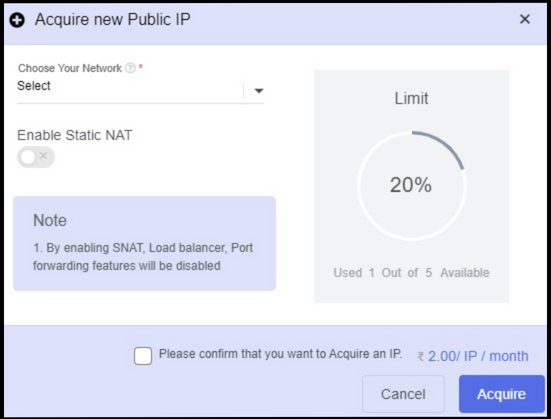
- Choose your Network - To acquire a public IP address, choose the network.
The loadbalancer and port forwarding features can be enabled by disabling static NAT while acquiring a new public IP address.
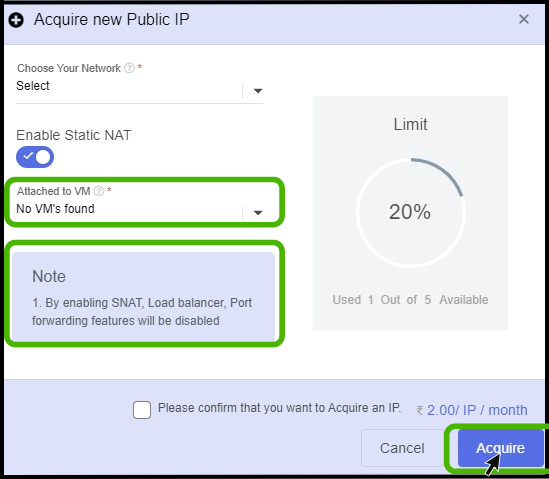
The loadbalancer and port forwarding features can be disabled by enabling static NAT while acquiring a new public IP address.
- To confirm the acquisition of the new IP address, click on the check box.
- The price is charged by the administrator to acquire a new IP address
- Finally click on the Acquire button.

- Now the IP adress has been created successfully.
Releasing public IP address

- To Release a Public IP, click on the release icon which is available on the Action menu.
- You will get a confirmation notification on the portal once you click on it.
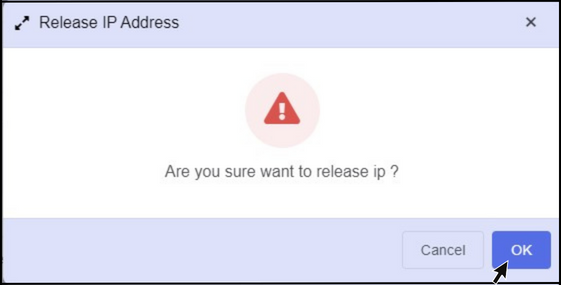
- To release the IP address, click OK.

- Now your IP has removed successfully.
Virtual Private Cloud
A Virtual Private Cloud (VPC) is a private network interface for collections of StackBill resources.
Because VPC networks are inaccessible from the public internet and other VPC networks, they provide a more secure connection between resources.
Traffic within a VPC network doesn’t count against bandwidth usage.
VPC Overview on StackBill CMP
- StackBill Virtual Private Cloud is a private, isolated part of StackBill.
- VPCs can have their own virtual network topology that resembles traditional physical networks.
- In the virtual network, you can launch VMs that have private addresses in the range of your choice.
- VPC enables you to group similar kinds of instances according to IP address ranges by defining network tiers within the network range.
VPC (Virtual Private Cloud) in StackBill CMP
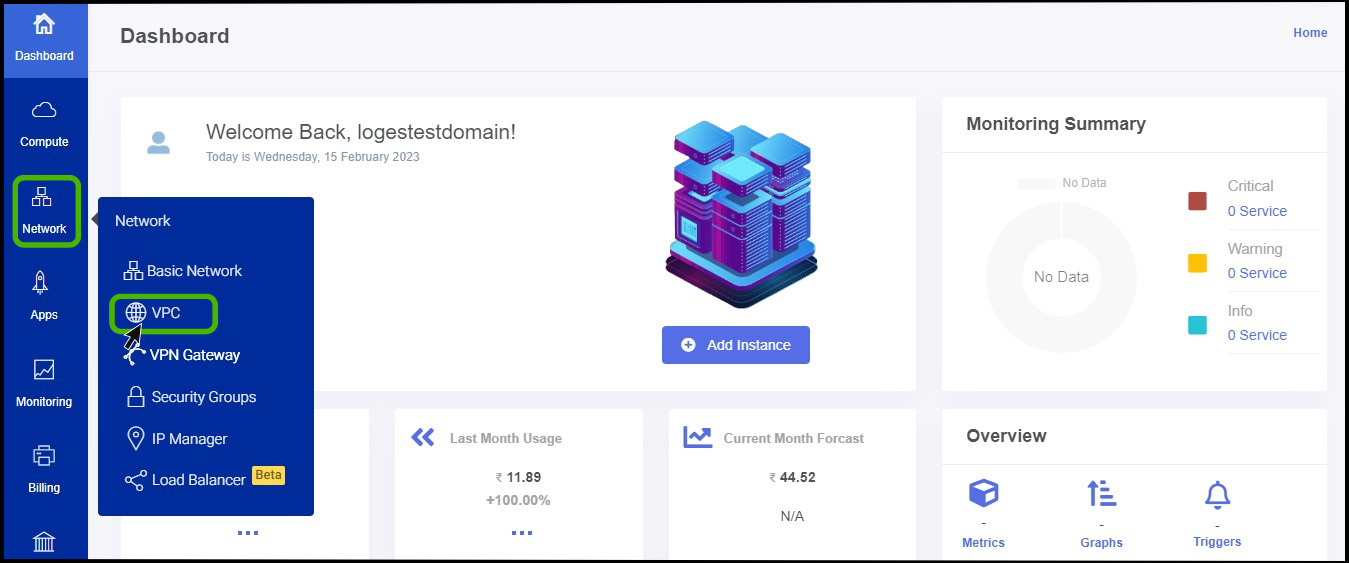
- Click on the Network dropdown button below the compute icon, Which is available in the top left corner. from the dropdown, Click on VPC option.
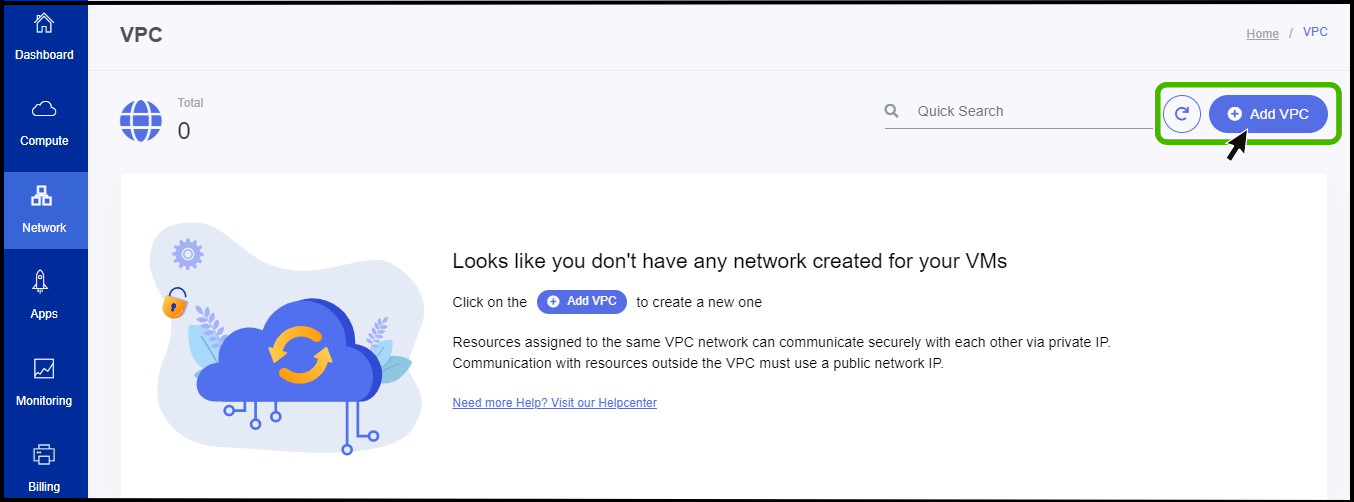
- VPC option appears on the screen.
- At right side of the panel the user can able to see a option called ADD VPC, Click on it.
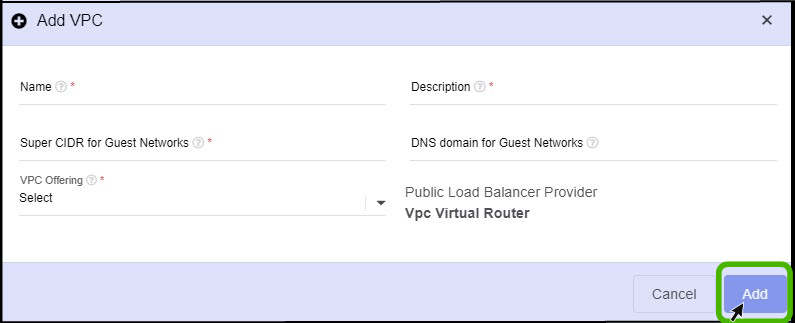
- Name - Provide a name for the VPC you are creating.
- Super CIDR - Defines the CIDR range for all the tiers (guest networks) within a VPC. When you create a tier, ensure that its CIDR is within the Super CIDR value you enter.
- VPC offering - Choose a VPC offering.
- Description - Give a short description regarding the vpc creation.
- DNS Domain - DNS Domain for Guest Network - If you want to assign a special domain name, specify the DNS suffix. This parameter is applied to all the tiers within the VPC. That implies, all the tiers you create in the VPC belong to the same DNS domain. If the parameter is not specified, a DNS domain name is generated automatically.
- Click on Add button.
- Now your VPC has been created Successfully.
Overview of Load Balancer in Stackbill Cloud Management Portal.
A load balancer can be deployed as software or hardware to a device that distributes connections from clients between a set of servers. A load balancer acts as a ‘reverse-proxy’ to represent the application servers to the client through a virtual IP address (VIP). This technology is known as server load balancing (SLB). SLB is designed for pools of application servers within a single site or local area network (LAN).
Add a load balancer to an instance in StackBill Cloud Management Portal.
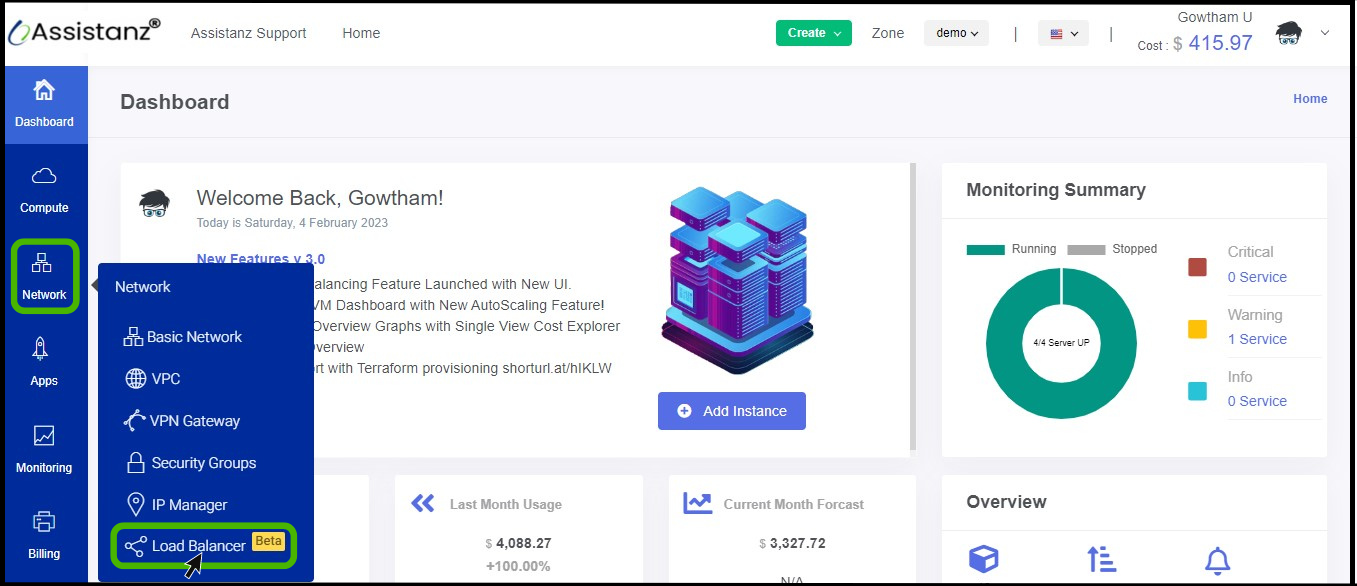
- Click on the Network dropdown button below the Compute icon, Which is available in the top left corner. from the dropdown, Click on Load Balancer, to create a new Load Balancer.
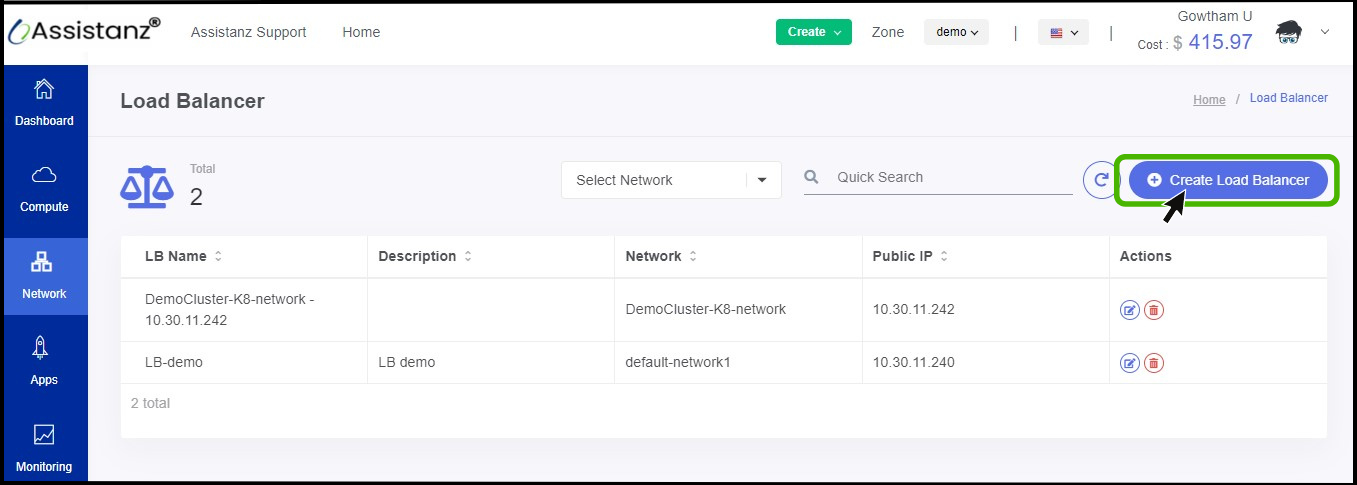
- Load balancer screen appears.
- On the right side of the panel you can see a option called Create Load Balancer option, Click on it.
- Add Load Balancer option appears on the screen.

- As a first step enter a name and description for the load balancer that you create.
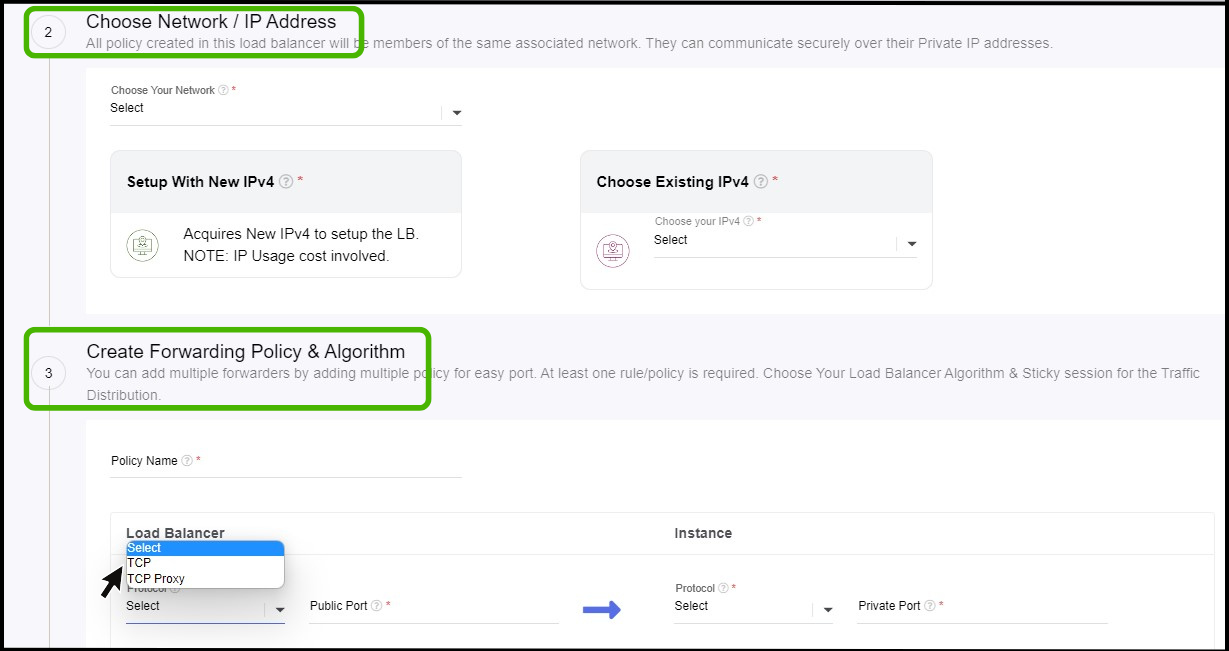
Network & IP Address
- Here you select the network and IP address for the Load Balancer.
- Create Forwarding Policy & Algorithm
- Policy name - Give a Policy name.
- Select the protocol and assign a Port number for both load balancer and instance.
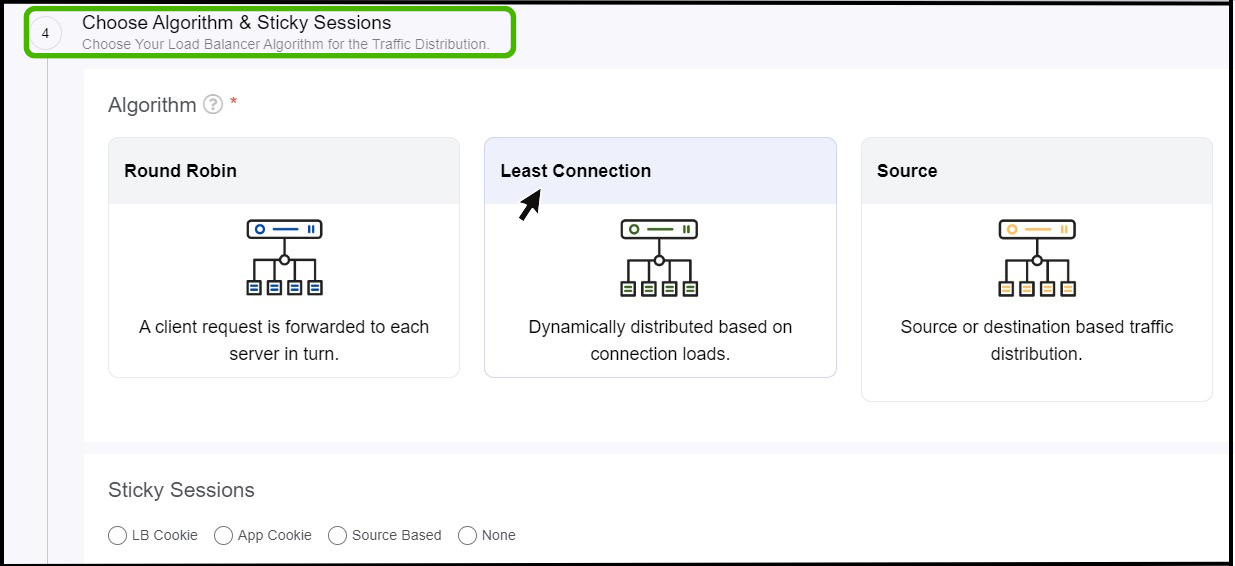
Choose Algorithm and Sticky Sessions
- Choose your Load Balancer algorithm for the traffic distribution.
- Select the sticky session as per the requirement.
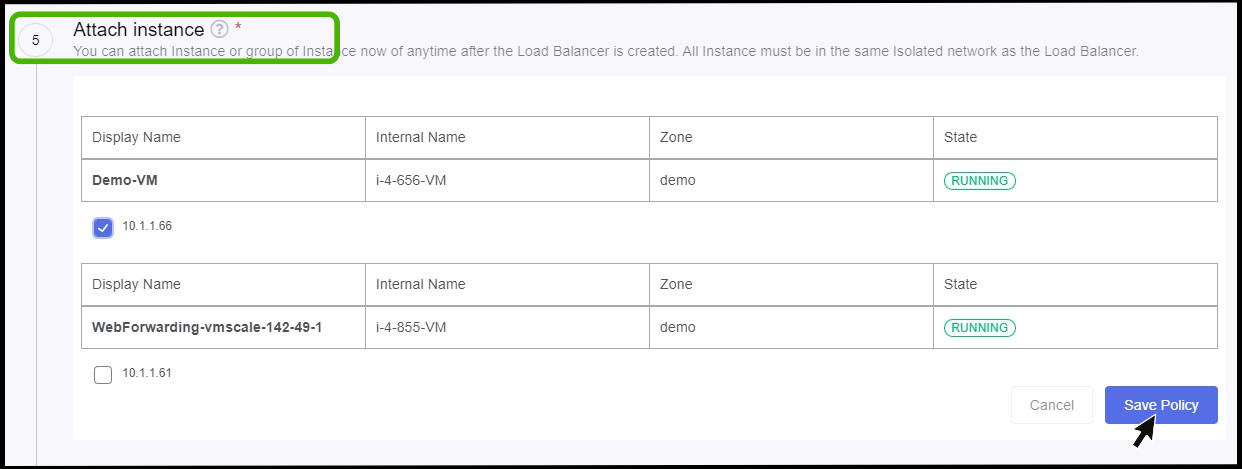
Attach Instance
- Attach the policy to the required instance and click Save policy button in the below.
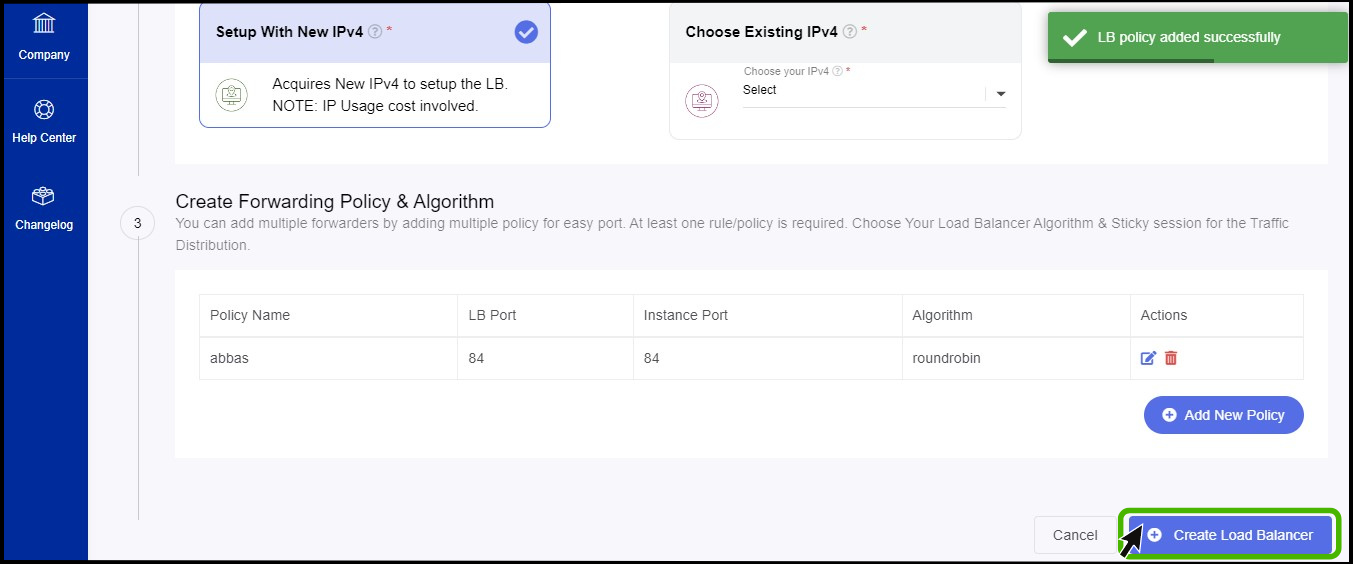
- Now the Load balancer Policy has been created successfully.
- Once the policy has been created successfully click on Create Load Balancer button which available on the below.
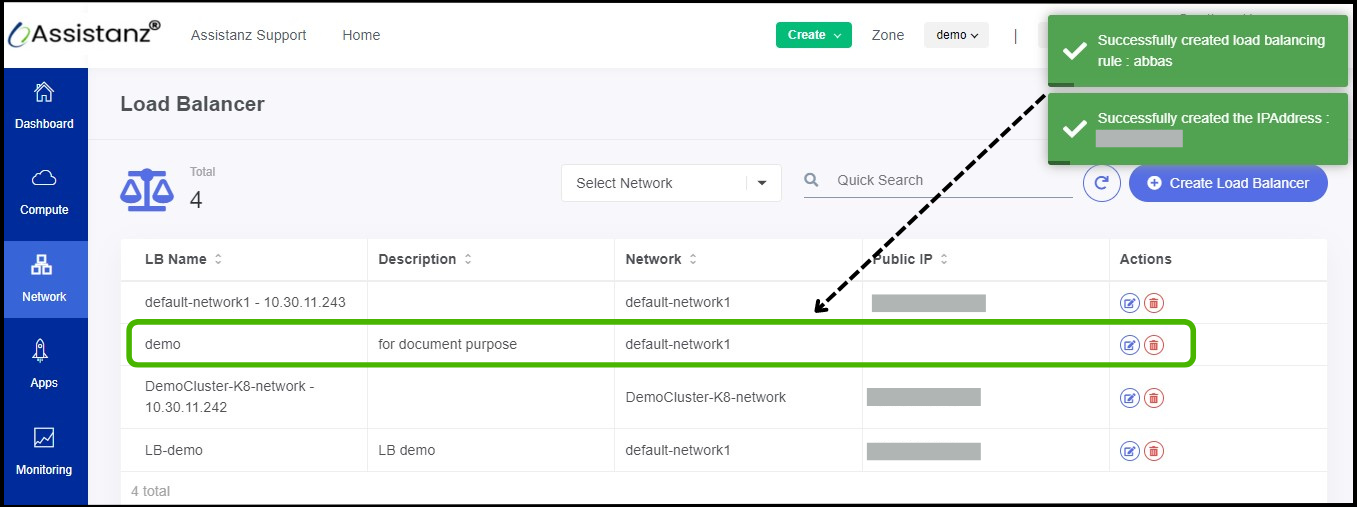
- The load balancer has been successfully configured on the instance.
- It is now possible to view the created policy on the Loadbalancer dashboard.
About StackBill
StackBill is a complete self-service intuitive Cloud Management Portal with extensive features leveraging Apache CloudStack® with state of art years of expertise.